Mod Setup
This guide assists you in creating your first mod and aims to help you understand the mod structure.
There can be a lot of complexity in the initial setup of Starsector mods, as they require the correct workspace setup to enable the compiling of Java code. For that purpose, people tend to use community made templates for setting up their mods. You can use the mod template generator below to make your own.
The Jar is something like a zip of your compiled Java code; a similar name to the Folder name should work fine. The Mod Plugin is a special Java file that is used as the main entrance where Starsector talks to your mod. A good example of a name would be "NexerelinModPlugin" (from Nexerelin) or "SCModPlugin" (from Second-in-Command).
Extracting the Template
After the template has finished downloading, extract it with a tool like Winrar, 7zip, or whichever OS-specific zip program is available for you.
For the purposes of this guide, let's imagine you have named your mods folder TemplateMod in the mod generator. This should provide you with the TemplateMod folder after extracting. Move this folder into your mods folder in your Starsector installation. The result should look like this:
- Starsector
- mods
- TemplateMod
- mod_info.json
- + Other Files in the folder
- TemplateMod
- mods
Make sure that the ''TemplateMod'' folder has the mod_info.json file inside of it. If you have extracted it wrong, there might be another TemplateMod folder inside the TemplateMod folder. In that case, move the contents of the inner folder into the upper level TemplateMod Folder, so that the contents of the folder match the graphic above.
Installing Dependencies
The mod template is configured by default to use multiple common library mods. As such, you need to have them installed. You do so like you would with any other mod, by placing them into your /mods/ folder. You may have some of them already as well. If you do not want to use those libraries, you can remove them from your configurations later.
Required Libraries
Opening the Project with IntelliJ
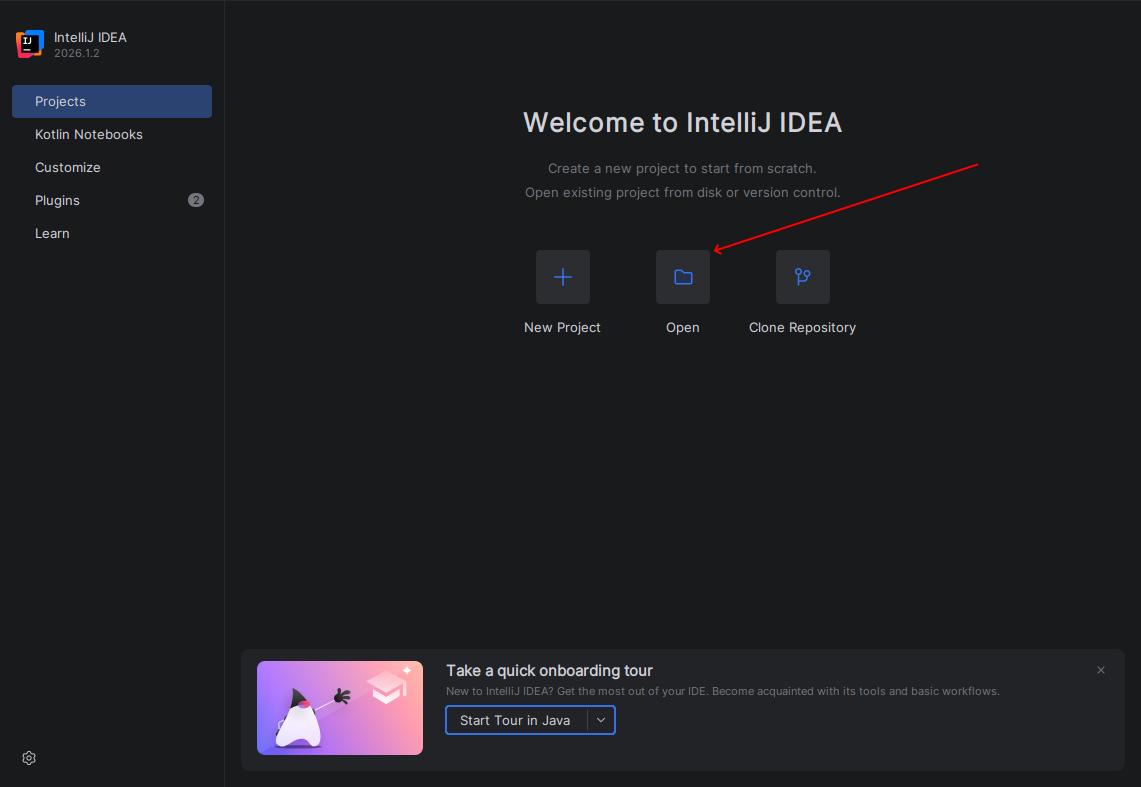
As mentioned in the Required Tools page, the most commonly used IDE (Integrated Development Environment) in the community is IntelliJ Idea. As such, this guide and other guides will assume the use of it. IntelliJ is the environment that we use to develop our Java code, but it can also be used to modify other file types. Now open IntelliJ. Once you do, you should see a dialog like this one appear. Press the "Open" button and open your mod folder.
If you already had a project open, or opened the wrong folder by accident, click on the Hamburger icon in the top left of IntelliJ, hover over "File" and click "Open" to select the correct folder
Make sure that the folder that are you opening in IntelliJ is the one with the mod_info.json file inside of it. Later steps will fail if you select the wrong one.
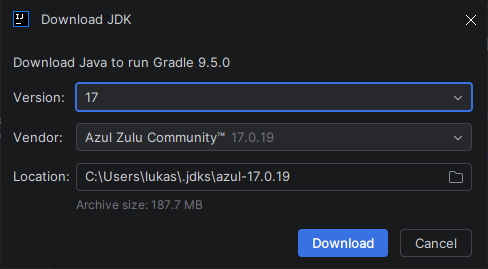
After opening folder, you might see this window pop up. In the case it does, simply select 17 for the version and Azul Zulu Community for the Vendor. This will only occur if IntelliJ doesnt find a Java JDK preinstalled on your computer.
Navigating IntelliJ
After opening the project, you will see a view that looks somewhat like the following screen. Multiple areas have been highlighted.
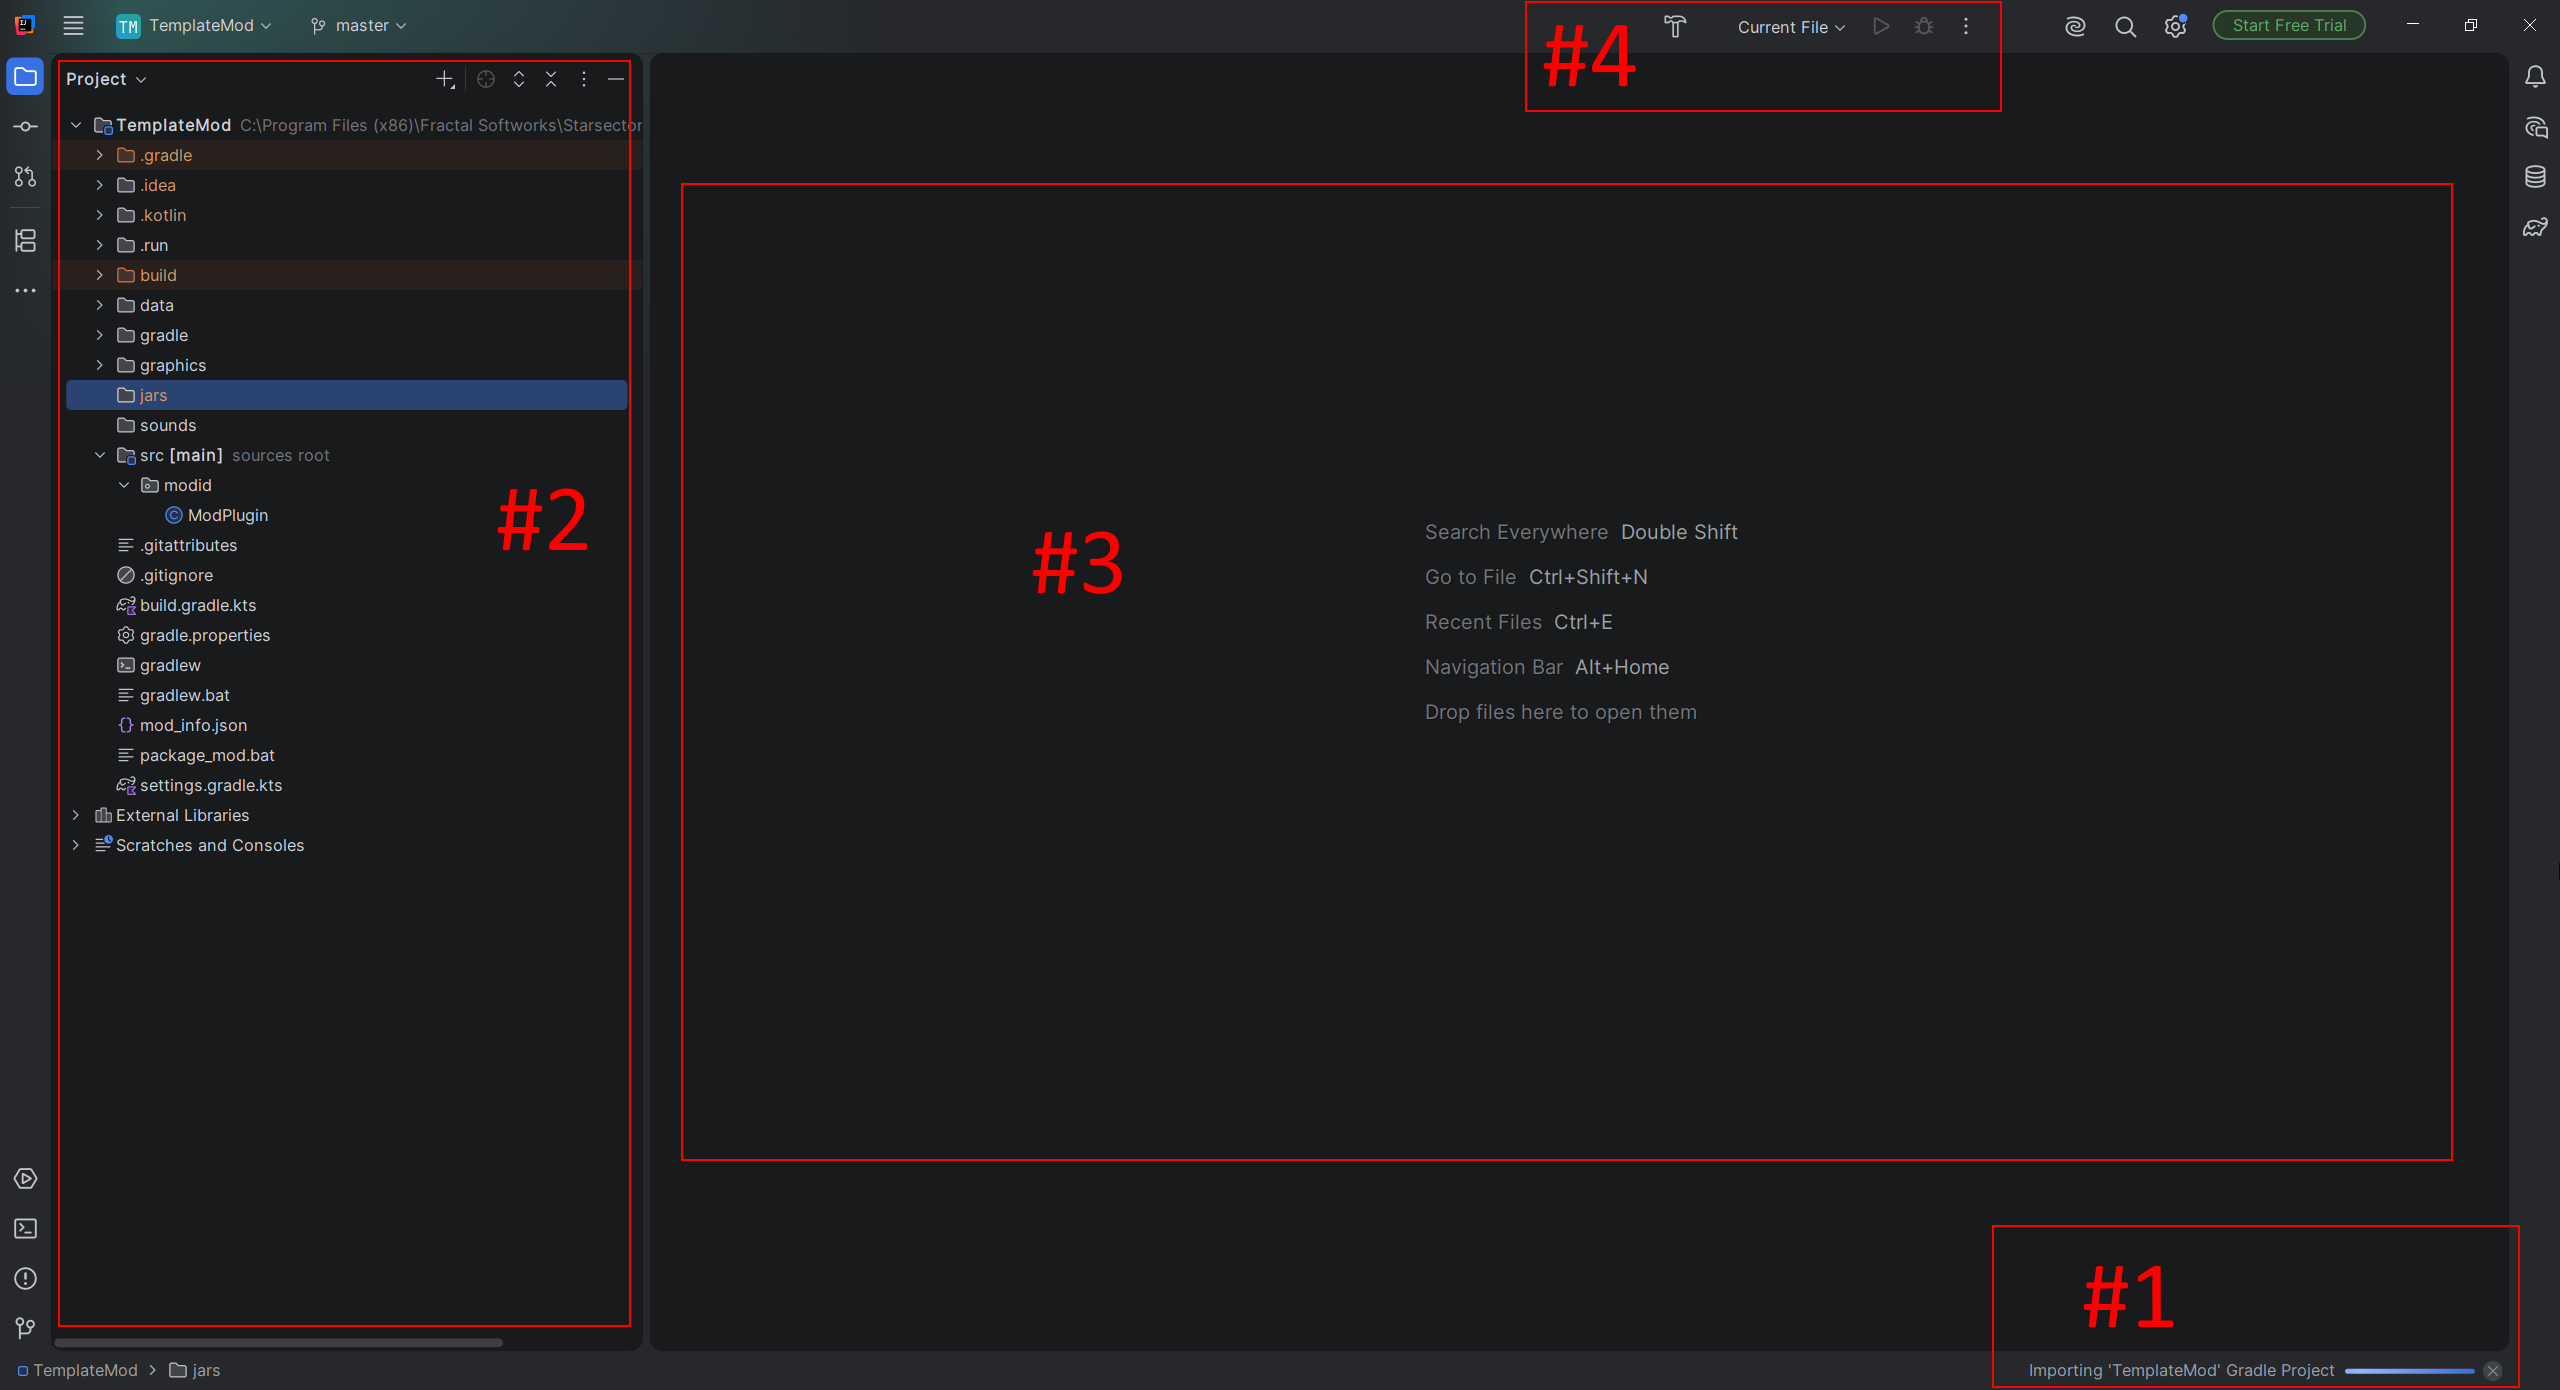
Area #1 displays information about background processes that IntelliJ and other services currently perform. When you first open the project, it will perform a bunch of setup and downloads. You usually want to wait for it to be done before working on the project or starting it. This may take a few minutes the first time you open the project.
Area #2 shows IntelliJ's file explorer. You can double click a file to open it. You can see a folder called src that is marked with a special icon. This folder is where all of your Java code will be located.
Area #3 is where files that you open will appear, like in a text editor.
Area #4 is where the run configurations are located. This section allows you to compile and start running Starsector from within IntelliJ. They will be important in the next section.
Compiling and Running the mod
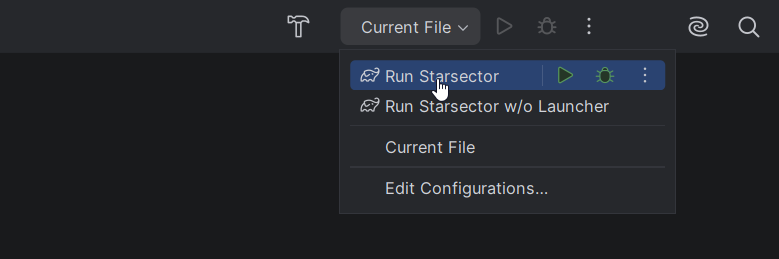
For the next step, we try to get our mod running. We haven't made any changes yet, but the template has a mechanism that lets you see if the setup works correctly. For this we want to locate the run configurations in the top right of IntelliJ (check the prior section if you can not find it).
Once you have located it, click on "Current File". In some cases, IntelliJ may have already auto-selected the right configuration, but if it has not, select Run Starsector from the dropdown. Run Starsector w/o Launcher will become very useful later, as it skips the launcher and immediately starts the game, but for our first launch we want to make sure we just run Starsector. This is because we still need to enable our mod in the game's launcher.
After you have selected the right configuration, check out the two green icons to the right of the dropdown. The green play button will compile the mod and start the game. The green bug icon will compile the mod, start the game and attach the Debugger. The debugger is a very useful utility, but is out of scope of this guide, so let's start the game with the play button. The first launch might take a while.
Note that code needs to be compiled to have any effect. If you edit some of your code and then start Starsector normally, outside of IntelliJ without compiling your code, none of the changes you have made will have applied. There are multiple ways to compile your code, but using the available run configurations is the simplest way.
Now your game should be starting. Do not forget to enable your mod in the launcher. If your mod does not appear in the launcher, double-check if you have really placed the template in the right location. If that does not fix it, check out the Troubleshooting guide further below for more help.
After you have enabled your mod, continue and start the game for real, and wait for it to finish loading.
It finished loading, and crashed?
This is intended! As the error message mentions, it's a test to see if the mod correctly compiled and loaded. The Template mod contains a line of code that will crash in the main menu, and if it doesn't compile, it will not run there. As such, if you do not get a crash here, you should refer to the troubleshooting section.
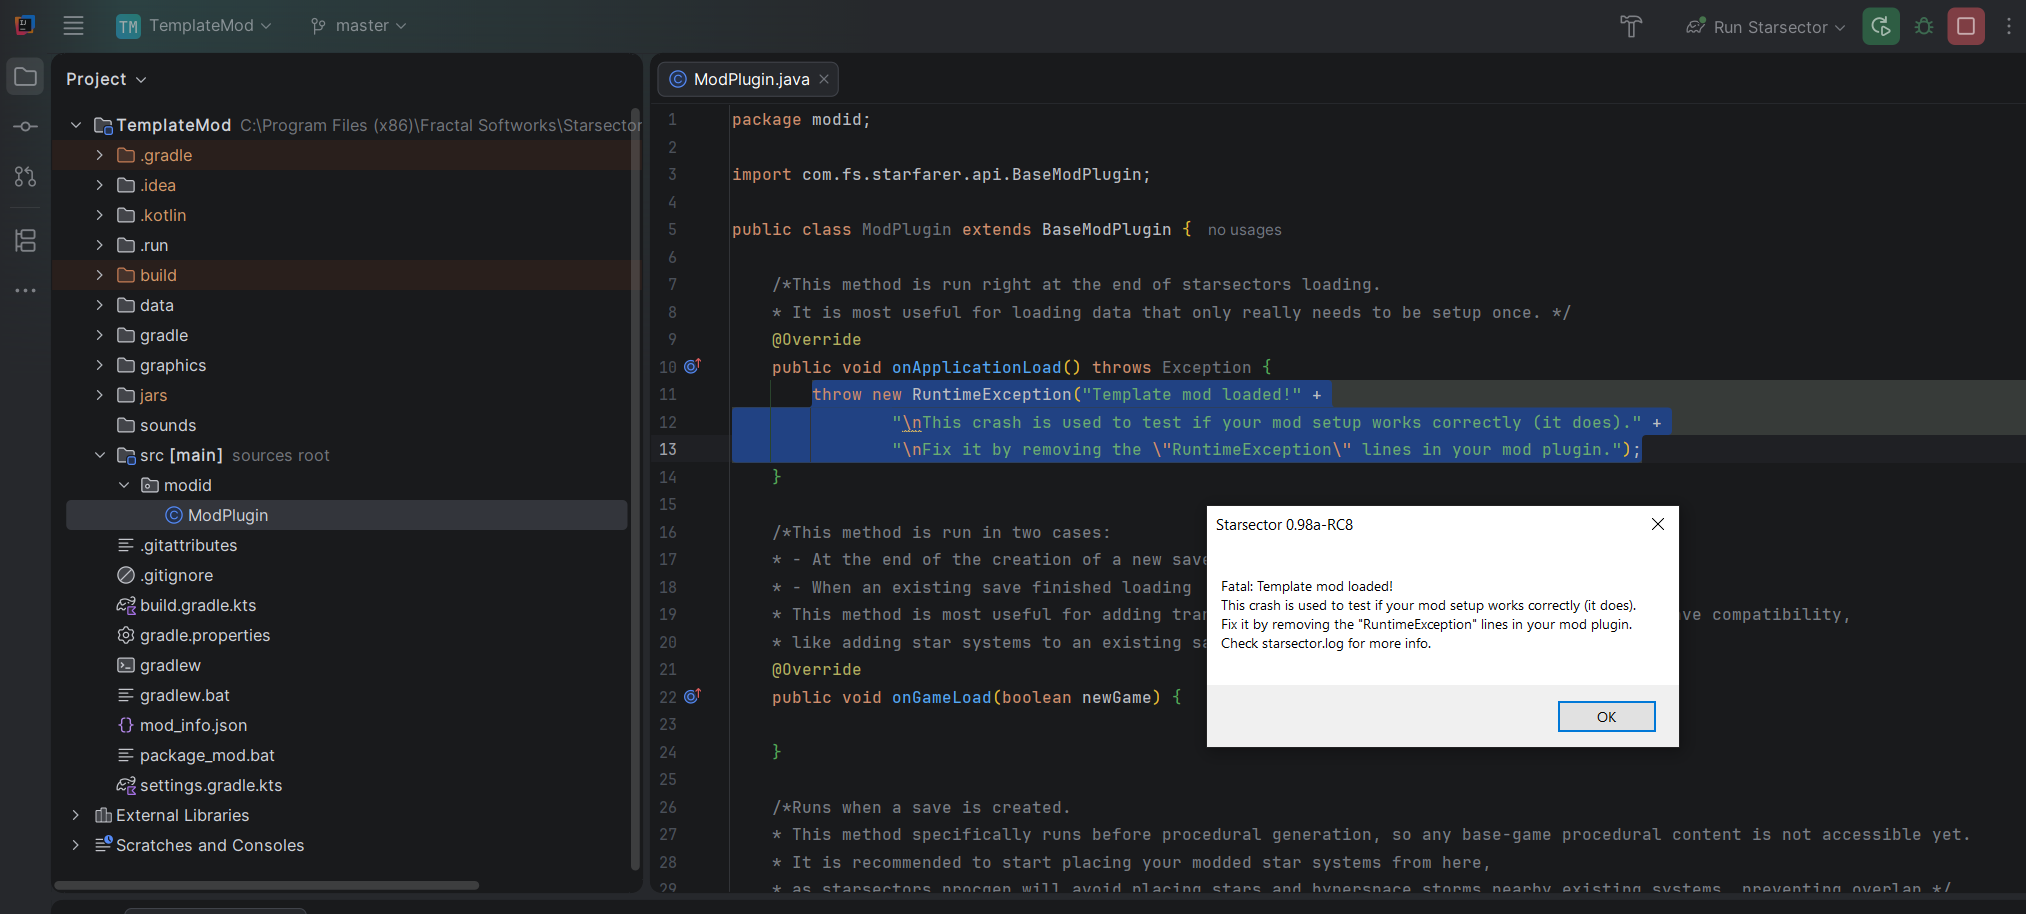 You can see the specific crash message in the white window of this screenshot.
The screenshot also highlights in blue the bit of code that you have to delete to remove the crash. You can find it in your mod plugin, the name of which you have chosen earlier when generating the template. The file to modify will be in YourModFolderName/src/yourModsID/YourModPluginName.java. Removing this piece of code, and then re-running the game with IntelliJ's run configurations will recompile the mod with the crash removed. For your second launch, you can try selecting the skip-launcher option instead, as we do not currently need the launcher.
Template Overview
It is worth taking a deeper look at some of the things the template contains. You may not need this information right now, but it is good to be aware of it for later. Your current mod folder should look somewhat like this:
- Starsector
- Mods
- YourMod
- data JSON & CSV Configuration Data
- graphics Sprites
- sounds Sounds
- jars Where your compiled code ends up in
- src Where your source code is in
- mod_info.json Mod configuration, tells starsector things about your mod
- build.gradle.kts Build configuration, information about how your mod is compiled
- package_mod.bat A script that you can run to zip up your mod
- YourMod
- Mods
In reality you will see many more files, but those are the ones that are worth talking about the most.
mod_info.json
You can modify this file either within IntelliJ's file explorer or by opening it with VSCode. Within IntelliJ or VSCode you may see some errors; this is due to the # comments included in the file. IntelliJ and VSCode may not recognize them as they are a custom format, but Starsector will load fine with them.
The mod_info.json file tells Starsector all the basic details that it needs about your mod. If there is a syntax error in the file, or the file does not exist, Starsector will not be able to find or load your mod.
It has:
- The name and id of your mod.
- What starsector version it supports
- Where to find your code, and where your code's entry point is.
- Which mods your mod requires to work (dependencies).
- The version of your mod
{
  "id": "template_mod", # Mod ID, should be lowercase
  "name": "Template Mod", # Display Name
  "author": "author",
  "utility": false, # Utility mods are mods that can be safely removed from saves.
  "version": "1.0.0",
  "description": "Template.",
  "gameVersion": "0.98a-RC8",
  "jars": [ "jars/TemplateMod.jar" ], # Where your code is
  "modPlugin": "modid.TemplateModPlugin", #Where your code's entry point is
  "dependencies": [
    {
      "id": "lw_lazylib",
      "name": "LazyLib"
    },
    {
      "id": "MagicLib",
      "name": "MagicLib"
    },
	{
      "id": "lunalib",
      "name": "LunaLib"
    },
  ],
}
If you ever rename your Mod Plugin, or the folder it is placed in, you will need to modify the modPlugin field to match those changes.
build.gradle.kts
This file controls the template's build system. It manages your dependencies and how the mod's code will be compiled. There is a lot of complexity within it, but there are a few simple configurations at the top of the file. You should only edit it with IntelliJ. For the most part, you should be able to ignore it for now.
build.gradle.kts example
//Automatically points to the starsector folder if the mod is placed in to the "mods" folder.
//If you do not place the project in to your mods folder, replace this with the path to Starsectors root folder.
val starsectorPath= "../../";

//The name of the file that the code is compiled to. This will automatically be placed into the /jars folder.
//Make sure that the "jars" entry in your mod_info.json matches this.
val jarName = "TemplateMod.jar"

//Name for the Zip that is created when you run package_mod.bat.
//This zip includes the data, graphics, jars, sounds and src folder.
//It also includes the mod_info.json and .version files at the root folder.
val zipName = "TemplateMod.zip"

//Other mods to load as compile-time dependencies. Adding them will provide auto-complete for their functions.
//Each entry is the jar name. The build searches every mod /jars/ folder for a matching file ("LazyLib.jar" -> "Starsector/mods/LazyLib/jars/LazyLib.jar")
//Mods added this way still need to be added to mod_info.json if they are always required (hard-dependency).
val modDependencies = listOf(
    "LazyLib.jar", //LazyLib
    "LazyLib-Kotlin.jar",

    "MagicLib.jar", //MagicLib
    "MagicLib-Kotlin.jar",

    "Graphics.jar", //GraphicsLib
    "LunaLib.jar", //LunaLib

    //"ExerelinCore.jar", //Nexerelin
)
You may notice that both mod_info.json and build.gradle.kts include a section for dependencies. The two are for different use cases. The dependencies in mod_info.json are to tell Starsector which mods are required for your mod to be activatable. The dependencies in build.gradle.kts provide the build system with information about your dependencies; with it, your IDE will be able to auto-suggest code from them and make working with them easier. If you use code from a dependency and don't register it here, you will get an error during compilation, causing it to fail. You can learn more about this at the Dependencies page.
When modifying the build.gradle.kts file, a small button will appear in the top right of IntelliJ. When you hover over it, it will say Sync Gradle Changes. You should press this whenever you make changes to this file. It will ensure that IntelliJ is up-to-date with information about your dependencies and other settings.
Whats Next?
With the template set up, the next steps are up to you.
If you want to get to adding content as quickly as possible, you can check out the quick start guides. They are follow-along guides that show the steps for implementing some content with relatively little theory.
If you want to understand the modding environment a bit more first, you can take a look at the Beginner Concepts section. You can also decide to look at it only after completing some quick starts.
Beginner Concepts
Introduction to Java
A personal recommendation (from this thread's author) is to take the Java guide on this wiki or take a course from an external source at some point. If you consider staying around in the community for longer, it will be quite worth it. It may seem like a lot of effort, but just a few hours of looking into the material will save you all the time that you will spend bashing your head against a wall when trying to fix errors in your code that you have no knowledge about.
Other Sources
After this there is no structured continuation. You can play around with your own mod, check out guides and concepts under the "Programming & Configuration" section, take a dive into Spriting in the "Spriting" category, or check out the source code of other mods to learn a bit more at your own pace.
Troubleshooting
IntelliJ Caches
TBD